Assembly Help
On-line Instruction Manuals:
For Trampoline Combo Safety Net:
Pack Contents:

*The tubes have a padded sleeve for protection of user in case of impact in use - please do not remove!
Diagrams for parts:


| Parts Name | 6' Trampoline Combo | 10' Trampoline Combo | 14' Trampoline Combo | 16' Trampoline Combo |
| Lower Steel Tube | 6 pcs | 6 pcs | 8 pcs | 6 pcs |
| Upper Steel Tube | 6 pcs | 6 pcs | 8 pcs | 6 pcs |
| Screw Sets | 12 psc | 12 pcs | 16 pcs | 12 pcs |
| Plastic Spacer | 12 pcs | 12 pcs | 16 pcs | 12 pcs |
| Safety Net | 1 pc | 1 pc | 1 pc | 1 pc |
| Spanner | 1 pc | 1 pc | 1 pc | 1 pc |
| Allen Key | 1 pc | 1 pc | 1 pc | 1 pc |
Assembly:
A. Spread the Safety net out flat on the trampoline mat as shown in figure A1, insert the upper steel tubes into the lower steel tubes locating the button pin as shown in figure A2.

Note: The white foam padding may have to be moved to locate the pin.
B. Working round the outside of the net, insert the support poles into the vertical sleeves of the net, as shown in figure B3.

C. Lift the support poles vertically and position each next to a vertical section of the trampoline leg as shown in figure C4.

D. Using the screw sets(with a spacer fitted between the enclosure tube and the trampoline leg.) Tighten these in position with nylon lock nuts and cap the ends with the acorn nuts as shown in figure D5, the enclosure net to hang below the outside edge of the trampoline.

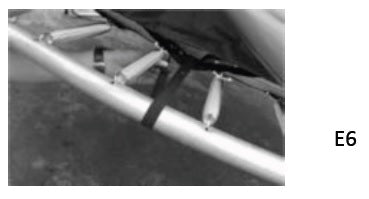
E. Take the plastic hooks sewn on safety net and fasten these to the triangle hooks at the jumping mat to secure the enclosure net in place, as shown as E6.
Important Warning!!
Finally, please check that all fasteners are tightened securely and that the net is taut. This check should be carried out regularly to ensure continued safe use of the enclosure.
For Regular Trampoline Safety Net:
- This Regular Safety Net is for all Super Jumper trampoline.

Pack Contents:
| Parts Name | 12' Trampoline | 14' Trampoline (4 U Legs) |
| Upper Steel Tube (Pipe) | 8 pcs | 8 pcs |
| Lower Steel Tube (Pipe) | 8 pcs | 8 pcs |
| Attachment Bracket (Steel Jig) | 16 pcs | 16 pcs |
| Screw Set (Butterfly Nut) | 32 pcs | 32 pcs |
| Safety Net | 1 pc | 1 pc |
| Spacer | 16 pcs | 16 pcs |
Diagrams for parts:

Assembly:
Step 1:
- Fixing on Lower Steel Tube onto trampoline legs with two Attachment Bracket Sets, two Spacers and firm them using the Screw Set as shown in A and B.
- Fixing all Lower Steel Tube onto trampoline together by Screw Sets, Spacers, Attachment Bracket Sets in order.
Step 2:

- Insert Upper Steel Tubes into Lower Steel Tubes as shown in the picture.
Step 3:

- Walking around the trampoline gradually ease the enclosure net to the level of the trampoline pad.
Step 4:

- Take each elasticated strap(along the bottom edge of the net), pass wrap around the trampoline frame fasten using the hook/ring. Fix the hook into ring in order.
IMPORTANT WARNING:
- You should go back now and stretch all attachment hooks tight and double check to see whether you have fastened the jigs use the screw sets or not, so the safety net stands stiff. Otherwise, the safety net will not function properly. Then finish assembling.
For Magic Safety Net:
- This Magic Safety net is mainly used for 14 ft trampoline, but can also be used for 14 ft trampoline combo.
Pack Contents:

| Parts Name | 14' Trampoline | 14' Trampoline Combo |
| Lower Steel Tube | 8 pcs | 8 pcs |
| Upper(Padded) Steel Tube | 8 pcs | 8 pcs |
| Attachment Bracket | 16 pcs | 16 pcs |
| Screw Set (Butterfly Nut and Safety Nut) | 32 pcs | 32 pcs |
| Enclosure Net | 1 pc | 1 pc |
| Spacer | 16 pcs | 16 pcs |
| Plastic Cap | 8 pcs | 8 pcs |
| Tying Strap | 16 pcs | 16 pcs |
Diagrams for parts:

Step 1:

- Fixing on Lower Steel Tube onto trampoline legs with two Attachment Bracket Sets, two Spacers and firm them using the Screw Set as shown in A and B.
- Fixing all Lower Steel Tube onto trampoline together by Screw Sets, Spacers, Attachment Bracket Sets in order.
Step 2:

- Insert Upper Steel Tubes into Lower Steel Tubes with plastic caps as shown in the picture.
Step 3:

- Position net as per image above – between leg sections of trampoline frame
-
Used the tying strap to the top and bottom pass through of the enclosure net, the strap adhere to on the net.
-
Measure the distance of the pole, adhering the strap the distance of similar of the pole.
- Fixing the Net onto Plastic Cap and Support pipe with strap.
Step 4:

- Make sure to check the net are stretch.
IMPORTANT WARNING:
- You should go back now and stretch all attachment hooks tight and double check to see whether you have fastened the jigs use the screw sets or not, so the safety net stands stiff. Otherwise, the safety net will not function properly. Then finish assembling.